Drawing with Basic Shapes in Affinity Designer (no Pen Tool needed)
- Isabel
- Sep 30, 2020
- 9 min read
Updated: Apr 13, 2022
In this written tutorial you'll learn how to easily draw without the need of the Pen tool and only using the stock Basic Shapes (also known as Primitive shapes) such as the ellipse, rectangle, rounded rectangle, square, etc. I'll use Affinity Designer but this can also be done in Affinity Photo, although it might take you a bit more effort, as it doesn't feature the precious Corner tool that Affinity Designer does.
You can also join us in the illustration help group here

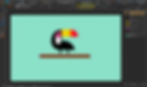
Final artwork created in Affinity Designer (Click to enlarge)
It is well known that the Pen tool is one of the most important tools in graphics software, and more specifically in vector drawing applications, such as Affinity Designer.
However, this has changed a bit with the ubiquitous presence of digital tablets and more in particular the iPad, where the stylus "sets us free" from using the mouse and thus, the pencil tool is taking much more relevance in the tool set than it used to.
Being a question I am asked often, my personal preference when drawing with vectors is using a mouse. I suppose I am used to it and I feel more comfortable than using the stylus when I draw with the Pen tool. But that's just my personal preference.

This article revolves around other ways to approach the creation of vector artwork, that doesn't imply the use of any of these two mentioned tools (Affinity Designer Pen Tool and Pencil/Brush). There are other ways to draw and this is what we are going to see here.
The idea is that you only make use of basic forms to create a character or try to create your own version of this Toucan illustration, so you get to experiment how it's done.
It can be anything, an animal, an object, a person... you name it!
What it's interesting about it, is not only how bold and beautiful the technique is, but the many uses you can apply it to. Be it fashion, T-shirt design, stickers, signage, logos, etc.
Before we start I want to showcase some examples, of some talented people doing great things with simple basic shapes.
Praga Zoo signage by Iva Návojská Pechmanová.


African Golden Cat by Jag Nagra

Stack of Seagulls by Messymod

Animodul by Atipo

Playful, colourful, simple and beautiful. Let's start!
1. Create a New Document
Go to File>New (Cmd/Ctrl+N) and give it a size of about 2000px x 1200px at 72DPI (if you want to make it print ready, set it up to at least 300DPI). Press "Create". Once your new canvas is on the screen, remember to give a name to your document and place it in a folder of your choice within your computer: File>Save as (Shift+Cmd/Ctrl+S).

(Click to enlarge)
Tip: Press Cmd/Ctrl + 0 (zero) on your keyboard to centre the canvas and see its boundaries. If you want to see the real size onscreen, you can press Cmd/Ctrl + 1 and you will get a 100% view.
2. Put a Background
Let's start making use of the protagonist elements in this tutorial, the basic shapes.
On the left tool bar (1), select the Rectangle shape and drag it on your canvas.
Select a colour of your choice to fill it with it. In my case, this will be the sky, so I have chosen a blue/ greenish colour. Apply a bit of noise to give it a bit of texture (optional) (2).
Tip: The noise option is a bit hidden on the interface! By default, at the bottom of the colour panel, you will see an option with a slider that says "Opacity" while in the image below you can see "Noise" (2). Click on the little circle to switch between the two.
Name your object in the layers panel as "Background" (3). Also, it is a good idea to lock the background layer with the padlock icon on the top right corner of the Layers panel, so we don't move it around by mistake while we are working.

(Click to enlarge)
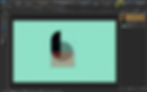
3. Creating the Toucan's Body
Select the Rounded rectangle shape (1) from the basic shapes on the left tool bar.
Place it in your canvas dragging over it. Give it a black colour. When you select any basic shape in Affinity Designer or Affinity Photo and place it on your canvas, you will see a little orange dot(s) on it, either the moment you draw it, or while having it selected and press "A" on your keyboard.
These orange dots allow you to change the original shape of any basic shape. On the upper contextual menu for each basic shape, there is the option "Single radius" checked (2).
Uncheck it to change the values of each corner individually. Once unchecked, the contextual menu changes and displays the options for each one of the corners in our rounded rectangle tool shape (3): TL (top left), TR (top right), BL (bottom left), BR (bottom right).
Set TL and BL up to 100%, and TR and BR to a 0%. Your rounded rectangle should now look like this:

(Click to enlarge)
Next, select the Ellipse basic tool shape (1) and also, it is a good idea to turn ON the Snapping (The horseshoe icon on the upper tool bar) (2). This will make it much easier to position accurately new and existing objects by 'magnetizing' or 'snapping' them to other objects or document elements.
Drag you cursor over the canvas to draw a circle. About the size, make it as big as you need so it looks well integrated with the other part of the body, as in the example. Press "Shift" while doing this to constrain proportions at least initially. If we feel the circle needs a bit of adjusting, re-scaling or stretching, we can do so later on as we go.
Lower the opacity of the ellipse to something that allows you to see through it (you can do this via layers panel (3) or pressing a given number on your keyboard, i.e.: number 4 will lower it down to a 40% opacity), and place it overlapping the previous shape in such a way the snapping helps making them perfectly aligned.

(Click to enlarge)
I have modified the height of the first shape to make it longer vertically, so everything feels more balanced and fits correctly and less cluttered, especially later on when I place the beak. Also, as mentioned before, I have made the hind part of the Toucan's body (the ellipse) less circular and more elliptical (see image below).
Select the Rectangle basic shape you'll find in both Affinity Designer and Affinity Photo in the left Tool bar and draw a rectangle in your canvas.
Give it a transparency to see through it so you work more comfortably. Place it overlapping the ellipse as in the image below.

(Click to enlarge)
Next, select both rectangle and ellipse (make sure the rectangle is on top of the ellipse in the Layers panel) and from the top menu "Geometry" press "Subtract" (1) to cut the base of the ellipse.
(Click to enlarge)
Your shapes should now look something similar to this:

(Click to enlarge)
Repeat the same operation with the other shape.
IMPORTANT: Make sure the angle where they cut is 90º. This will be important later on.
You should end up with something like this:

(Click to enlarge)

(Click to enlarge)
In the image above, you can see both shapes selected and showing the nodes (squares are sharp nodes, circles are smooth nodes). It the case your shape has more nodes than shown here where we wanted to create a perfect 90º angle, delete them until it looks the same as in the image.
Next, select both shapes and again, on the Geometry menu, press on the first icon: Add (1). This will create a single shape out of the initial two. Make the opacity for this new shape 100%.
Note how we now only have one object (apart from the background) on the Layers panel. Name it "body".
With the Node tool (A in your keyboard), select the shape "body" and then select the node on the 90º bottom corner. Next, pick the Corner tool (C on your keyboard) and hover over the selected node. Pull inwards as shown in the video:
(Click to play)
Now, let's create the white area on the chest/face of the Toucan where the eye will be inserted with a Clipping mask. Select the Rounded rectangle shape on the left Tool bar and drag to draw it over the Toucan's body. On the contextual menu for the rounded rectangle shape, uncheck the Single radius option and enter these values for each corner:
TL: 100%, TR: 0%, BL: 50%, BR: 50%
Take this as an approximation of what your own shapes are asking for.
It should look similar to this:

(Click to enlarge)
Now, let's put the eye inside the white chest/face area. For this, select the Tear tool shape within the basic shapes in Affinity Designer or Affinity Photo list of pre-made shapes and draw it on your canvas (image 1) and insert it into the white chest/face shape, making a Clipping mask by dragging it bellow the white shape.
IMPORTANT: Make sure you put it inside as shown in image 2 where the pink shape is slightly indented with regards the the containing chest/face white shape.

(Image 1 - Click to enlarge)

(Image 2 - Click to enlarge)
Then, select the Ellipse shape and draw a circle with a thick stroke and place it on top of the pink shape (you can clip mask it but it is not necessary). Pick the colours you like. In my case, a black circle with a 8px yellow stroke.
4. The Beak
Select a rounded rectangle and draw it on your canvas. Pick a colour and add some noise. Name your object "beak" on the Layers panel. Uncheck the Single radius option on the upper contextual menu as we've done several times before and enter these values:
TL, BL and BR to 0%, and TR to 100%
Give it the right size to match the rest of the drawing and place it accordingly, remembering to have the Snapping on for better accuracy (top menu horseshoe icon), and make it look similar to this:

(Image 2 - Click to enlarge)
Next, draw several squares with the Square tool shape from the left Tool bar, apply different colours and/or blending modes of your choice to each one of them and clip mask them inside the beak the same way we did before.
I have resized a bit the whole beak to make it look shorter and wider and have applied also a bit of noise and a 50% opacity to two of these clipped squares, leaving the opacity to a 100% on the square placed on the pointy end on the beak. I will ad more details to the beak at the end of the tutorial when fine-tuning the illustration.

(Image 2 - Click to enlarge)
To create the feet I have used two Crescent tool shapes from the list of basic shapes.
5. The Tree Branch
Pick the Square tool shape and draw a wide rectangle on your canvas as in the image below. Don't worry about the colour now, pick any colour and make sure it doesn't have a stroke or outline applied to it.
Select the square shape, click on the contextual menu button "Convert to Curves" (1) (you can also do this by selecting the rectangle> Right mouse button> Convert to curves) in order to being able to reshape the rectangle into something less perfect using the Node tool (A) to modify the nodes on each corner.
(Click to enlarge)

(Click to enlarge)
Next, duplicate the branch 2 or 3 times and resize the new branches to make them smaller. Place them overlapping the main branch giving them different angles.

(Click to enlarge)
Select all the branches and, in the upper menu Geometry, press the first icon to apply an Add operation as we've done before for other elements. This will create one single shape out of the initial four.
Tip: If you want to create a Compound shape, which will result in the same we've just seen in the previous paragraph, but preserving each shape so you can modify them later on, press Alt/Opt on the keyboard while applying the Add (or any other) operation.
Next, apply a Linear gradient colour (two shades of brown) with the Fill tool (G on your keyboard) (1) and add a bit of noise to it (2).

(Click to enlarge)
6. The Leaves
Probably by now you can guess how to create them easily using basic shapes.
Select the Tear tool basic shape from the list and draw several leaves. Apply a green colour to them and add a bit of noise.

(Click to enlarge)
Let's now put all the Toucan's parts together on a group and the leaves and branch on another to put some order. Name your grouped layers accordingly in Affinity Designer Layer's Panel. Make sure the Toucan group is on top of the Branch group so the feet are visible over the branch.
Now it's a good moment to adjust just slightly some of the things that might need it, be it colours, shapes, sizes, etc, until you're happy.
I have added now the lower part on the beak, so it looks like it has two parts and not so blocky and flat as it was.
For that, I have duplicated the beak, removed the clipped squares inside the duplicated shape and then I have clip masked it into the main beak shape. I have also resized it so it fits properly into the main beak shape.
Then I've put the opacity of this clip-masked shape down to 55% and lastly I have added a Hard light blending mode to it to make a difference in the luminosity of both parts.
Then, I have grouped it all together.

(Click to enlarge)
7. The Sun
No mystery here. Draw a circle, pick a colour and add some noise. Done!
8. The Text
Select a font that you like, one that fits this playful schematic illustration, and place it on your Affinity Designer (or Affinity Photo) illustration.
You are done!
(Click to enlarge)
Join us in the illustration help group here